C. Gardiner, Chiselhurst


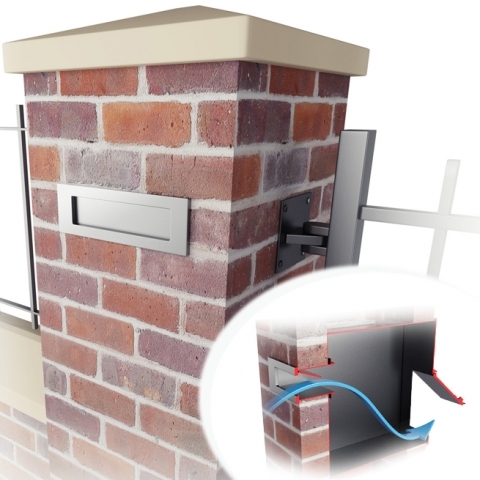


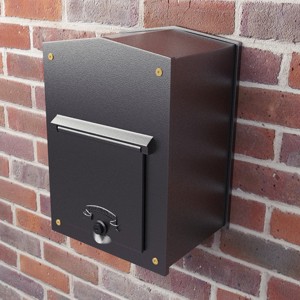
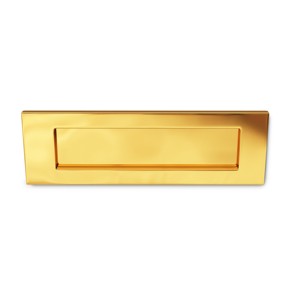
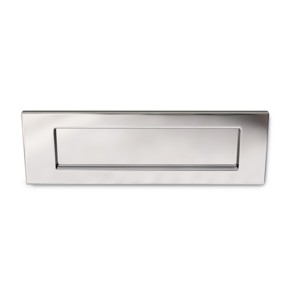
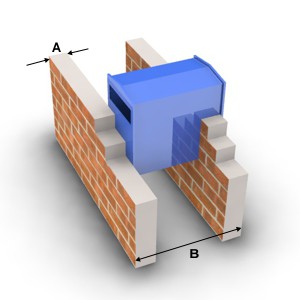
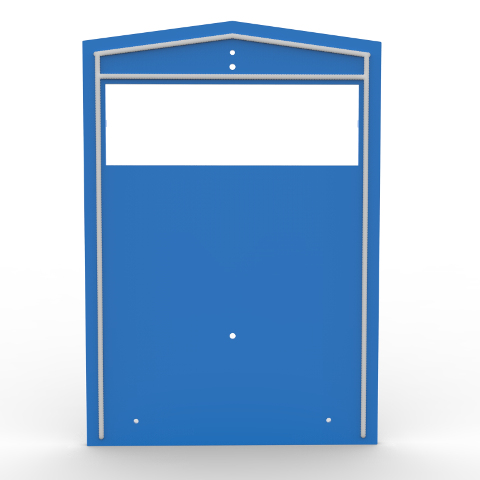
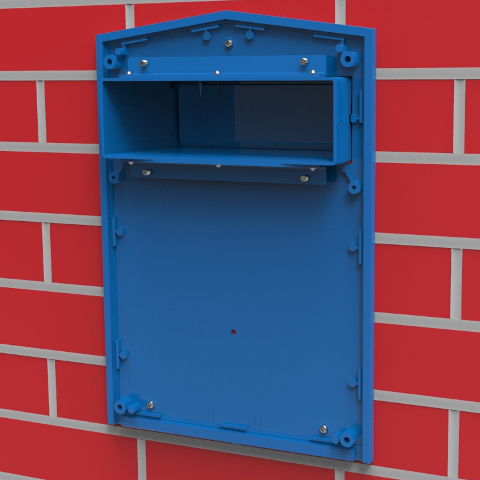
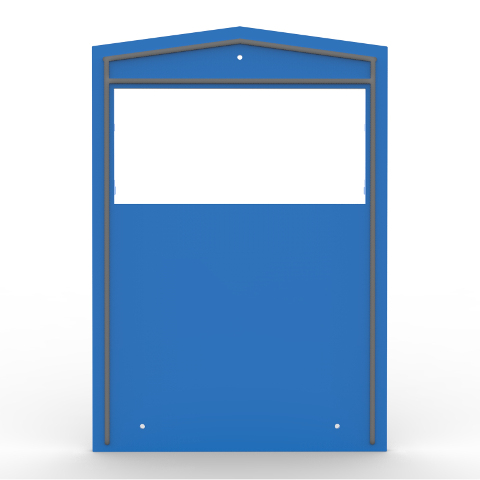
The stylish new Stamford mailbox.
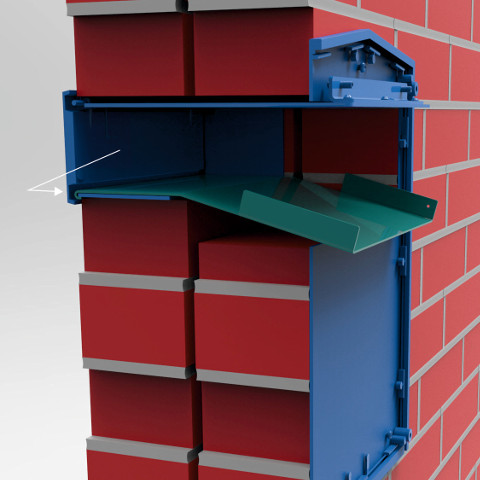
This letterbox uses a conventional and discrete letter plate but still has the same large capacity as our other post boxes. Your mail is delivered through the wall via a heavy duty chute attached to a traditional style letter plate and contained in a sealed storage box with a rear lockable access door.
Designed to be fitted through:
- Single brick walls
- Double or cavity brick walls
- Brick piers.
When built into a cavity wall or pier, the mail is securely stored within the cavity area allowing both the front letterplate and back casting to fit flush against the brickwork or rendering.
- Extremely secure design
- Standard size has ample capacity for all your mail and newspapers
- Customised case sizes available to fit any depth wall or pier up to 1000mm
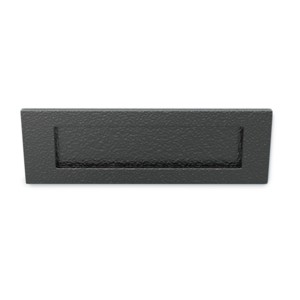
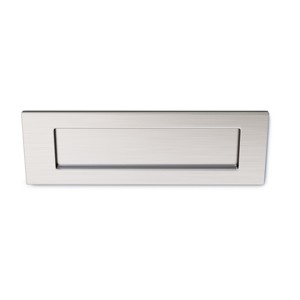
- Choice of polished brass, chrome, brushed chrome or textured black letter plates
- Supplied complete with 2 keys
Please note for 2 brick square piers the bricks either side of the box will need to be cut to accomodate the collection box.
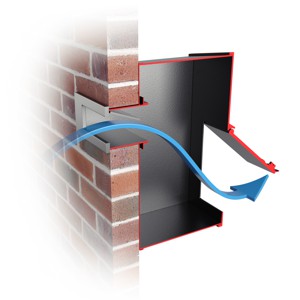
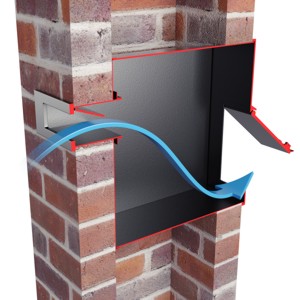 Sectional view of the LS10 mailbox through a brick pier showing operation
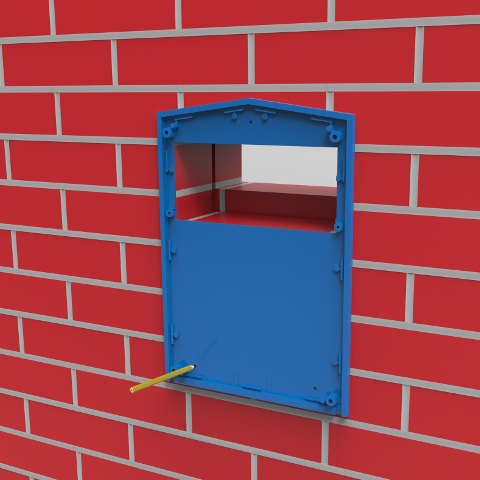
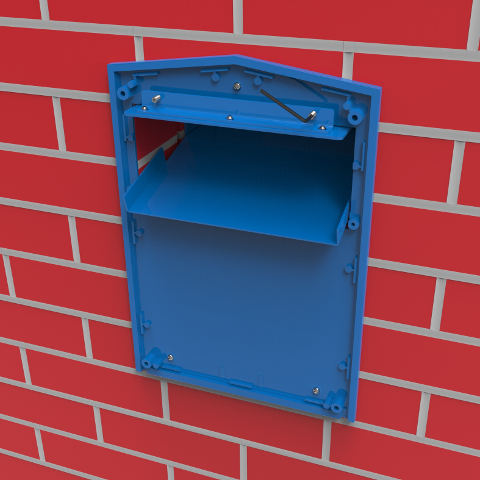
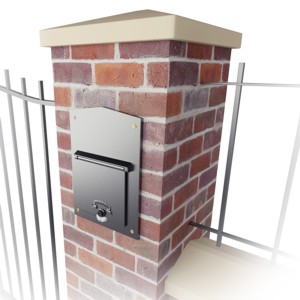 Rear view of the Stamford postbox fitted through a brick pier
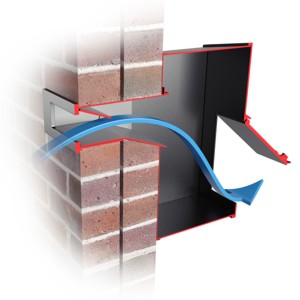 Sectional view of the letterbox fitted through a double brick wall showing operation
 Rear view of mailbox shown fitted through a brick wall
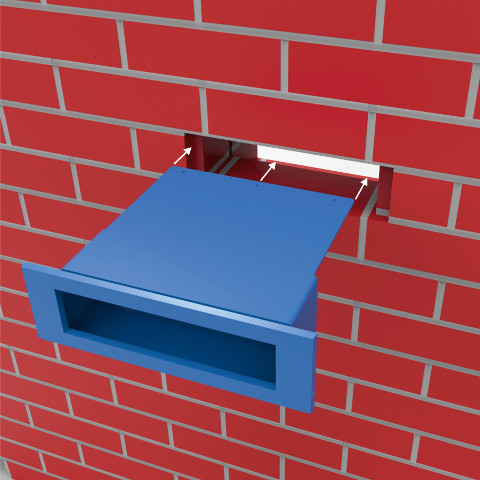
 Sectional view of the Stamford postbox shown fitted through a single brick wall
LS10 Letterbox Dimensions
The Stamford mailbox is designed to be installed into single, double and cavity brick walls in addition to brick piers up to 1000mm thick. There are different fittings depending on the depth of the wall or pier. The dimensions of all the fittings are shown below.
Shown below are the dimensions of all the Stamford postbox models. Dimensions are in mm
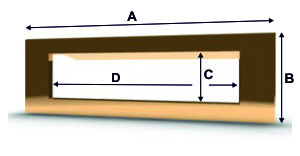 |
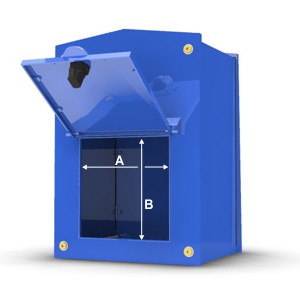
Letter plate These are the dimensions of the post flap supplied with the LS10. This post flap is shown in brass but is also available in textured black and polished or brushed chrome.
|
 |
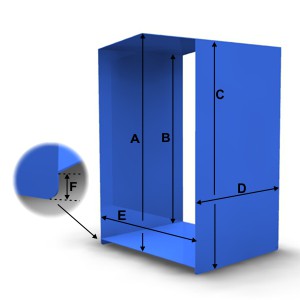
Single wall and brick piers chute assembly The single wall chute dimensions are shown below, the chute can accommodate wall thicknesses between 100mm and 112mm. The post flap above is not shown fitted, but when assembled it is attached to the front of the sleeve. This sleeve is used for all depths except double or cavity brick walls.
|
 |
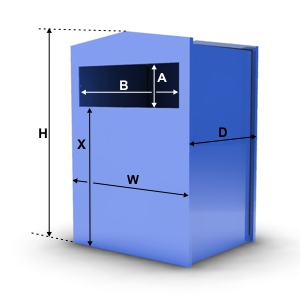
Double and Cavity wall chute assemblies The double and cavity wall chute dimensions are shown below. The double wall chute can accommodate wall thicknesses from 200mm to 225mm, whilst the cavity wall chute fits wall thicknesses from 272mm to 297mm
|
 |
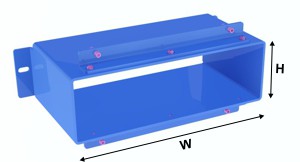
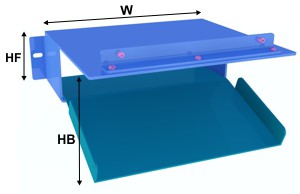
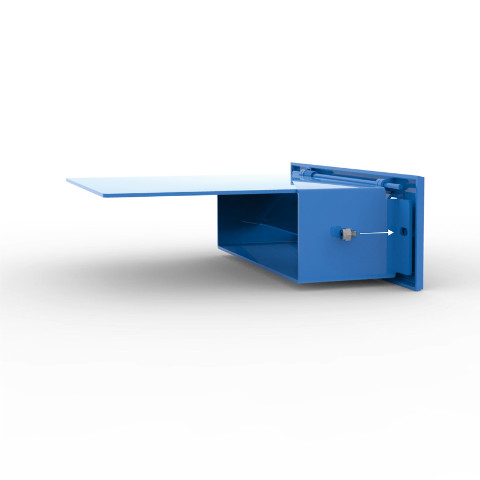
Collection Box The collection is located within the cavity area when fitted into a brick wall or pier, for a double or cavity wall the box is located at the rear.
|
 |
Collection Box Sleeve Shown below are the dimensions of the inner sleeve of the standard size collection box.
|
 |
Rear Access Door Below are the dimensions of the rear access door of the LS10 Stamford rear retrieval postbox.
The diagonal distance of the letterbox opening is 257mm, easily big enough to remove A4 or large packages. A telephone directory sized package can be removed from the letterbox without needing to be bent in any way. |
 |
Sleeves for deeper walls The standard case size is designed for single, double or cavity walls and 1½ brick* walls or piers. In addition we have standard size cases for 2, 2½ and 3 brick* walls. For other depth walls or piers we will need to manufacture a sleeve to suit. To make the correct size we require two dimensions as shown below.
* Based on a standard metric brick (215mm)
|
Shipping weight:
9kg for standard size model.
Overal dimensions:
295mm wide, 425mm high, 250mm deep (front to back, this can be extended up to 900mm)
Letterplate aperture
230mm wide x 53mm high
Components:
The front letterplate is made from solid brass and left polished or coated in a choice of polished chrome, brushed chrome or textured black finishes. The rear casting including the door is cast from pure aluminium in English foundries, whilst the main body is made from sturdy electro zinc coated steel. To ensure it's long lasting appeal, these components are thoroughly cleaned and primed before being phosphate treated and coated in a durable top quality low bake enamel in a choice of colours. All additional components (excluding lock) used are made from solid brass or stainless steel and assembled in England.
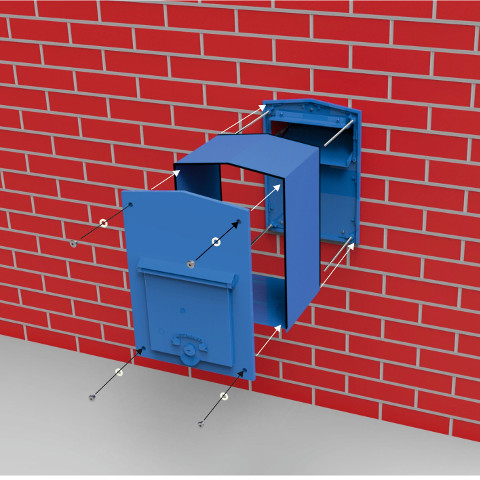
LS10 Stamford fixing instructions for a single brick wall or pier
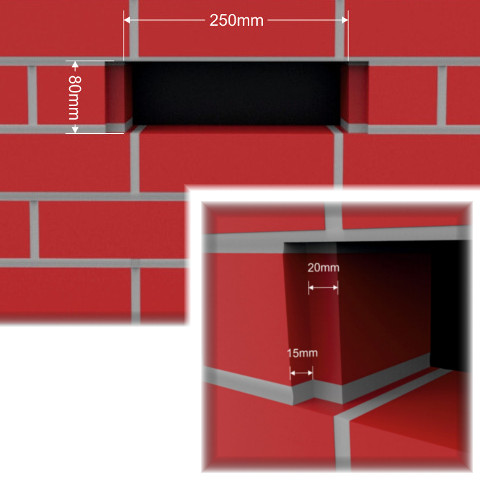 |
1) Cut a hole all the way through the front face of the brick wall (or if building a pier, the outer front face). 250mm wide x 80mm tall. Cut a notch each side of the outer face approx. 20mm wide x 15mm deep. This is to give clearance for the two nuts on the rear of the letter plate. |
 |
2) Take a note on how the letterbox is assembled. Now undo the four brass nuts on the back with the 4mm key supplied. Remove the back casting, unscrew the four M6 threaded studs. Replace the brass nuts including the nylon washers onto the studs. Put them safely to one side, as these will be required again on final assembly. 3) The letter chute is bolted to the rear of the front casting for transportation. Undo the two 6mm bolts and nuts, these are not required and can be discarded. |
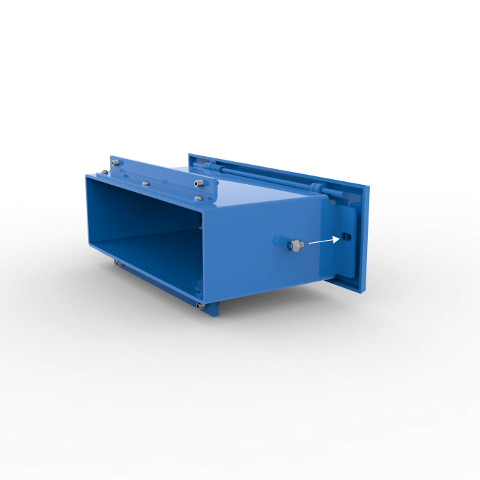 |
4) Using the two grub screws and nyloc nuts provided attach the letter plate to the chute. Making sure the hinge is at the top. DO NOT OVERTIGHTEN THE SCREWS. 5) Note the orientation of the top and bottom tensioning angle brackets, as they will be replaced the same way later. Remove the six button head screws from the chute using the 2.5mm hex key. Put the screws aside for later re-use. It is not necessary to remove the grub screws. |
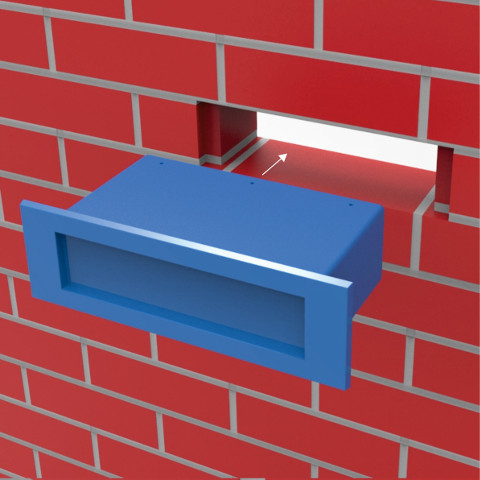 |
6) From the front of the wall/pier, get an assistant to push the chute through the hole until the letter plate butts up to the front face of the brickwork. Remain holding in place. 7) From inside the wall/pier, position the back plate over the chute and mark the three securing fixing hole positions. Remove the back plate and drill three 8mm holes. Do not screw the back plate to the wall yet. |
 |
8) On the wall side of the back plate put a generous bead of clear silicon, about 20mm in from the outer edges of the top, left and right-hand sides. (NOT THE BOTTOM EDGE) Also place a bead of silicon all around the chute hole about 5mm from the edge. |
 |
9) Locate the back plate over the chute and push firmly against the wall. Now secure with the three wood screws provided 10) Run a small bead of clear silicon around the top and side joints of the chute and back plate. Smooth off with a wetted finger to ensure a neat watertight seal. 11) Replace the tensioning angle brackets onto the chute using the six button head screws. 12) Using the 3mm hex key, tighten the 4 grub screws up against the casting to tension the letter plate against the front face of the wall/pier. (DO NOT OVER TIGHTEN). Now run a small bead of silicon around the outer edges of the letter plate and brickwork. 13) Next step is to re-assemble the case and rear casting. Ensure that the neoprene channel seals are positioned around the edges of the case. Re-assemble the rear casting and case onto the front casting using the four long threaded studs, brass nuts and nylon washers.
|
LS10 Stamford fixing instructions for a 2 brick pier
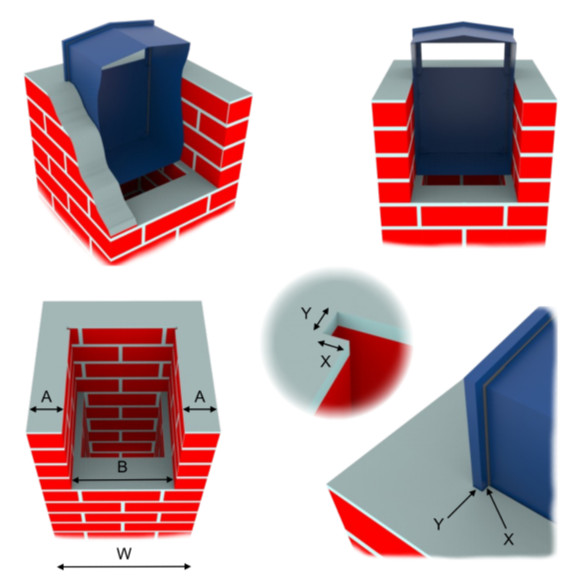
- A Width of shaved brick, between 80 and 82½mm (Based on a 445mm wide pier)
- B Width of gap to accommodate box, minimum 280mm
- W Width of a typical 2 brick pier, 445mm
- X Width of notch to accommodate front casting, 9mm
- Y Depth of notch to accommodate front casting, 11mm
In order to fit into a standard 2 brick pier, the bricks on the left and right hand sides need to be shaved back to leave a central gap between 280 and 285mm.
Based on a standard 2 brick pier which is approximately 445mm wide, the outer bricks would need to be cut down to a maximum of 82½mm and a minimum of 80mm.
There also needs to be a notch cut on either side at the front to accommodate the front casting.
LS10 Stamford fixing instructions for a double brick or standard cavity wall
|
1) Cut a hole all the way through the front face of the brick wall 250mm wide x 80mm high. Cut a notch each side of the outer face approx 20mm wide x 15mm deep. This is to give clearance for the two nuts on the rear of the letter plate |
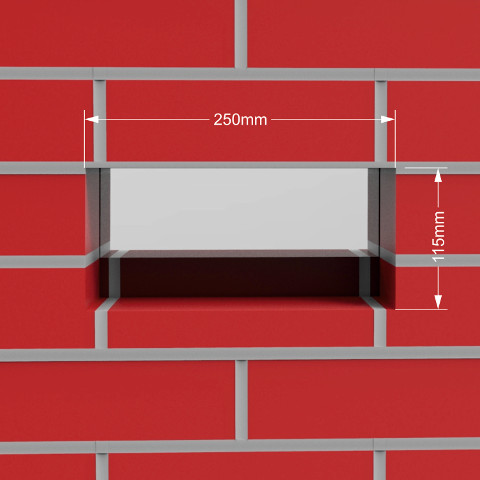 |
2) Cut a hole in the rear course of bricks an additional 35mm lower (250mm x 115mm overall) |
 |
3) Using the two 16mm grub screws & M6 nyloc nuts attach the letter plate to the chute. Making sure the hinge is at the top. (Ensure they are properly attached but DO NOT OVERTIGHTEN THE BOLTS. |
 |
4) From inside the wall, position the back plate over the cut out and mark the 3 securing fixing hole positions. Remove the back plate and drill three 8mm holes, insert the plastic plugs. |
 |
5) On the wall side of the back plate put a generous bead of clear silicon, about 15mm in from the outer edges of the top, left and right-hand sides. (NOT THE BOTTOM EDGE) 6) Now secure the back plate with the 3 wood screws provided. |
 |
7) From the front face of the wall, push the main letter chute through the cutout then attach the angled bracket with the 3 button head screws. |
 |
8) Push the lower plate through the chute and hook on to the lower front face of the chute. Pull back firmly into position. |
 |
9) Hold the top of the chute horizontally against the top of the cutout in the back plate and using the 3mm hex key tighten the two 6mm grub screws up against the casting to tension the letter plate against the front face of the wall (DO NOT OVER TIGHTEN). Now run a small bead of silicon around the outer edges of the letter plate and brickwork. |
 |
10)Next step is to re-assemble the case and rear casting. Ensure that the neoprene channel seals are positioned around the edges of the case. Re-assemble the rear casting and case onto the front casting using the four long threaded studs, brass nuts and nylon washers. We recommend that a further bead of silicon be run around the top and two sides of the back plate against the brickwork (NOT THE BOTTOM EDGE) |
 |
 |
| LS10 single wall/pier instructions |
|
|
| LS10 double/cavity wall instructions |